Luke McElroy from SALT Nashville Conference in Nashville, TN brings us this versatile use of hanging squares.
They used wooden squares wrapped with a cotton material lined with LED Strip Tape in order to create a “LED Wall” that they could project onto, map various patterns into the LED Squares, and most importantly tell a powerful story with. Their heartbeat was to show the conference how a set/stage design could tell a story and evolve as the story of the conference evolved. Using simple LED Strip Tape and a few Chinese DMX Powered controllers, they were able to use MadMapper to convert a very simple high contrast video into a DMX signal and into the lights.
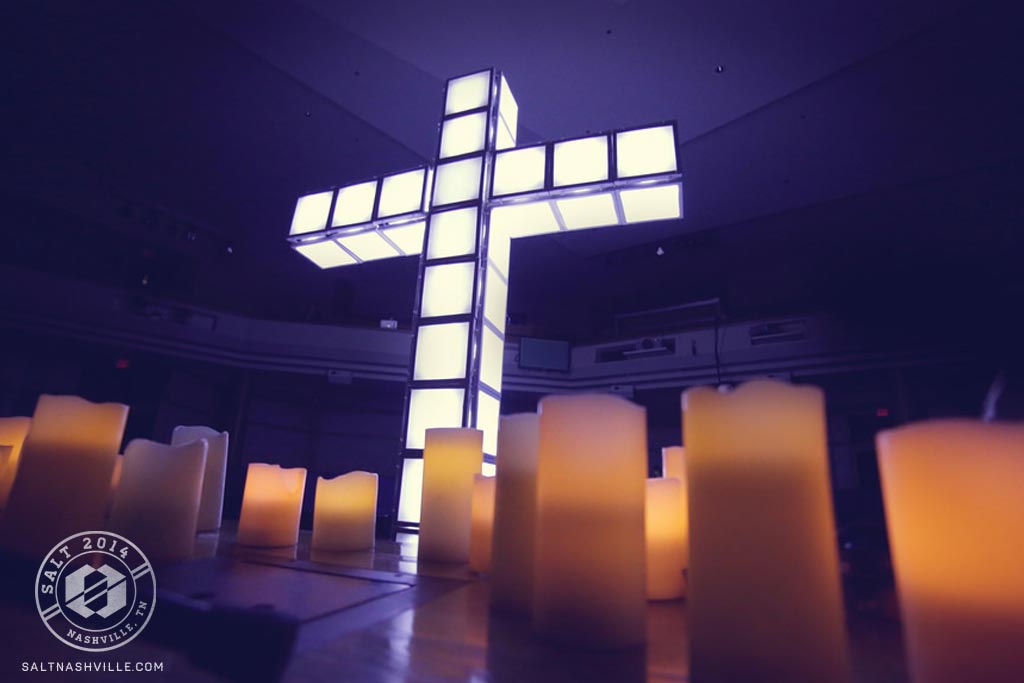
They also made sure the canvas on the front was able to absorb projected images from two 12,000 lumen projectors at front of house. Then they kabuki’d (or dropped free fall style) the entire set on the second day in order to represent our fallen and brokenness. Then the square panels were aligned in a manner to which they could put them in a giant cross and light the squares up one more time.
It cost $2500 to make with all parts, wood, controllers, cloth, and cabling.
Set build details:
- Each square was 1.5″ lumber cut into 4 pieces and staple gunned into a square.
- The used 400 square feet of muslin from a local fabric store.
- The squares were hung using S hooks – all of them were 3″ apart in every direction.
- They lined the squares with LED 5050 “white” LED strip tape.
- They cut each roll, which was 5m, into 3 pieces.
- They lined the LED tape on the inside of each panel effectively turning each panel into a “pixel”
- They made 100 squares and used 96 for the cross.
- The center screen was hand made. It was approximately 5×8′ and it was a non-standard ratio.
- They used some 27 channel DMX LED controllers that they found on eBay.
- They used about 8 controllers to control all the LED.
- They controlled the LEDs using a software app called MadMapper which allowed them to “pixel map” the LED In the panels, IE – each panel could effectively become a pixel of video.
- They also projected onto the panels using three 12k projectors – a Left, Right, and then one on the center screen.
- They used VidVox’s VSMX for all content playback on the surface.


Why Multi-Purpose Stage Elements Matter
One of the biggest challenges in church stage design is creating visual impact while staying within budget constraints. The SALT Nashville team demonstrated an ingenious solution: building modular elements that serve multiple functions throughout an event. By designing squares that could work as projection surfaces, LED pixel arrays, and symbolic stage elements, they maximized their $2,500 investment across an entire conference.
This approach to stage design thinking has become increasingly popular among churches of all sizes. Rather than building single-purpose sets that get discarded after one use, multi-purpose elements can be reconfigured, relit, and repurposed to tell different stories. The key is planning ahead—considering how each piece might function in various configurations before construction begins.
The use of muslin-wrapped frames is particularly clever because it creates a surface that accepts both projected light and LED illumination beautifully. The fabric diffuses harsh LED light into a soft glow while still maintaining enough reflectivity for projection mapping. This dual-purpose capability allowed the team to transition seamlessly between different looks without changing physical set pieces.
Understanding LED Pixel Mapping for Churches
Pixel mapping technology has revolutionized what’s possible with LED lighting in church environments. At its core, pixel mapping allows you to treat individual LED fixtures—or in this case, LED-lined squares—as pixels in a larger video display. Software like MadMapper translates video content into DMX signals that control each “pixel’s” brightness and color.
For churches considering similar setups, the entry point has become much more accessible. While the SALT team used 27-channel DMX controllers from eBay, modern options include dedicated pixel mapping controllers and even software solutions that run on standard computers. The key components you’ll need are:
- LED strip tape (5050 or similar high-density strips work best)
- Power supplies rated for your total LED load
- DMX decoders or pixel controllers
- Pixel mapping software (MadMapper, Resolume, or free alternatives like Lightkey)
- A computer with sufficient graphics capability to output the mapped content
The learning curve for pixel mapping has decreased significantly with better software interfaces and online tutorials. Many churches find that volunteers with basic video editing experience can learn to create compelling pixel-mapped content within a few practice sessions.
Related Designs
Looking for more inspiration with geometric shapes, LED integration, or projection mapping? Check out these related stage designs:
- Discochecks – A stunning checkerboard pattern using square panels with dynamic lighting effects that create visual movement across the stage.
- Checkered Past – Another creative use of square geometry featuring alternating panels that work beautifully with both static and moving light.
- Dotted Half Moons – Geometric circular elements arranged in an artistic pattern, perfect for churches wanting organic shapes with structured design.
- Weave Spots – An intricate woven pattern combining geometric precision with textile-inspired aesthetics for a unique visual texture.
- I Am Multi-Purpose – A versatile stage design showcasing how modular elements can be reconfigured for different events and messaging.
Pro Tips for Building LED Square Panels
Plan Your Power Distribution: LED strip tape draws significant power, and voltage drop can cause color inconsistencies across long runs. Calculate your total amperage needs and plan to inject power every 5-10 meters depending on your LED density. The SALT team used multiple controllers to manage their 100 squares—consider how you’ll route power and data cables before construction.
Choose the Right Fabric: Not all white fabrics work equally well for projection and LED diffusion. Muslin is affordable and works well, but consider testing samples with your specific projectors and LED color temperatures. Some fabrics may cast unwanted color tints or create hot spots with projection. Always test a sample square before committing to 100 units.
Build for Quick Assembly: If you plan to reconfigure your squares (like the SALT team did for their cross formation), design them for rapid connection and disconnection. Quick-connect fittings for power and data, standardized hanging points, and lightweight construction will make transitions smoother during services or events.
Consider Safety and Rigging: One hundred wooden squares represent significant weight when suspended. Work with qualified riggers to ensure your support structure can handle the load, including dynamic forces from movement or kabuki drops. Factor in safety cables for each panel and ensure all electrical connections meet local codes.
Related: Hexagon String Art – Discover how Village Baptist Church created stunning hexagon and hourglass shapes with RGBW LED lighting and creative string art patterns.
Related: Down the Light – Learn how Northland Church created dramatic fabric drops using Kabuki solenoids and DL-3 projectors for their Easter services.
Related: Pixel Perfect – Discover how Grand Avenue Baptist Church created a stunning pixelated stage design using cardboard boxes and LED lighting for their youth event.


wow>>>it’s amazing!could u kindly send me a step by step procedure as to how i can achieve this?thanks
What kind of cotton material did you use and where did you get it?
This is great! Likewise any more info on the details would be appreciated.
Thanks,
-Brad
I was there and it was epic. I’ll never forget it, and I bet I’ve told the story 100 times.
The set:
– Each sqaure was 1.5″ lumber cut into 4 pieces and staple gunned into a square.
– We used some 400 ft/sq of muslin from a local fabric store, really nothing fancy just cheap!
– The sqaures were hung using S hooks – all of them are 3″ apart in every direction.
– We lined the sqaures with LED 5050 “white” LED strip tape.
– We cut each roll, which was 5m, into 3 pieces.
– We lined the LED tape on the inside of each panel effectively turning each panel into a “pixel”
– We made 100 sqaures and used 96 for the cross.
– The center screen was hand made. It’s aproximarely 5×8′ and it’s a non-standard ratio.
– We used some 27 channel DMX LED controllers that I found on eBay.
– We used about 8 controllers to control all te LED.
– We controlled the LEDs using a software app called MadMapper which allowed us to “pixel map” the LED In the panels, IE – each panel could effectively become a pixel of video.
– We also projected onto the panels using 3 12k projectors – a Left, Right, and then one on the center screen.
– I used VidVox’s VSMX for all content playback on the surface.
Hope this helps!
How many rolls of LED tar did you buy and where did you get them?
How did you run the cabling in order to hide it?